Resources:
Additional Information:
|
Creating an original landscape
Landscape artists are artists that focus their skills on creating views of nature in an original way. In many cases they must add or alter what they see in order to express a particular feeling or mood. In so doing, they must reorganize nature in a way that is believable to the viewer and representative of their idea or meaning. This sketchbook entry will help us practice our observational drawing skill while at the same time allow us to exercise our creative ability in organizing an original landscape.
Organizing the landscape
- Collect the essential paint materials:
- Sketchbook
- Magazine with pictures of various landscapes
- Glue (stick works best)
- Scissors
- Pencil
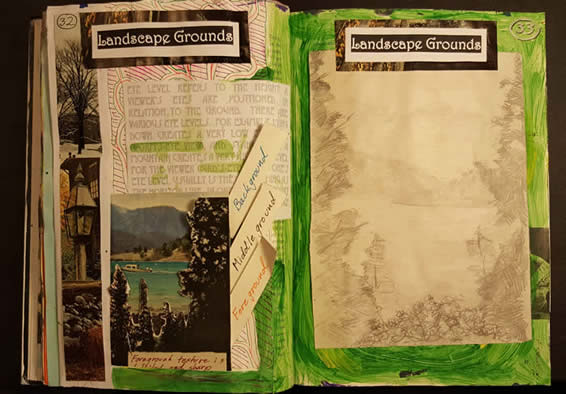
- Collect the appropriate clippings: Find three kinds of images in the magazines and cut them out. (These work best when they are all from the same eye level)
- A good background: It is best to choose something that appears to be far off in the distance like mountains, rolling hills, or islands. It is best to limit the amount of detail or texture when choosing this section. Distant objects generally appear lighter and have a cooler hue.
- A good middle ground: This is the in-between area of your drawing so this should not be a close-up of anything but it should be closer to the photographer than the background. This section should have some detail or texture but not too much.
- A good foreground: This is the area closes to the front of the picture plane so it should appear as if it is closer than the middle ground. This section should have plenty of detail or texture.
Mounting the resources into your sketchbook:
- On your next blank sketchbook page, glue the three clippings you’ve chosen. Use the glue stick and leave some space in between the clippings so you can author the page.
- Be sure to use enough glue so that the constant turning of pages will not dislodge the clippings.
- Combine some of the imagery from the three clippings into an original sketch. You can pick and chose items that appear in the clippings for this task but in the end it should look “right,” as it would in nature.
- Start by drawing the items you’ve chosen for the foreground first then adding as the drawing recedes into the middle ground and finally the background.
- Alter the shading on all items to match a single light source (in other words make sure it looks like there is only one sun in the picture so the clouds, trees, and buildings should all be lit from the same side.)
- Check the drawing for the change in the amount of detail in each section following the principles of aerial perspective making sure there is a clear background, middle ground, and foreground.
Authoring the landscape resource page
- Label the clipping page of your sketchbook “Landscape Grounds” at the top neatly.
- Neatly label each of the clippings according to how they were intended for use in your drawing.
- Using a ball point pen, draw a line from each distinct texture in each of the clippings then describe how these textures contrast accurately.
- On this page in full, complete sentences, and in a visually creative way, answer the following question correctly: (You may use two sides of the sheet if necessary.)
- Define “foreground,” “Middle ground,” and “background.”
- How can texture enhance the illusion of space?
- Define “areal” or “atmospheric perspective.”
- Which ground will be the most radically affected by areal perspective?
- List and define three basic eye levels.
Include two additional “facts” about these drawings (ex.: where they were drawn, what time of day it was, date, etc.)
Assignment Turn-in
- Using Google Drive or another .PDF Scanner App, create a .PDF of all pages included in this assignment from the Value Key Info to the Value Key Models.
- Upload or save your .pdf file in your Google Drive Turn-In folder in the appropriate assignment subfolder if available.
- Rename this .pdf as follows:
- <YourName>_<ProjectName>_<Assignment>.pdf
- Example- JohnDoe_StillLifeProject_ProjectPreparationPage.PDF
- NOTE- In Google Drive you do not need to add ".PDF" when you rename the file
|
