|
Table of Contents:
Resources:
Additional Information:
|
The 12-step Color Wheel
The 12-step color wheel will provide an opportunity for us to fine tune our skills at mixing color. The result will be a small color wheel that can be used as a tool for understanding and using color in our future artwork.
The Learning Goals:
(This is what the addition will be graded on at the end)
- Completion- Follow all of the directions and ensure the project is complete with titles, sub headings, all visual and written information.
- Density- Pages should be PACKED with information. So much so that a person should not be able to place a quarter on the page without it touching either written or visual information.
- Design- Carefully plan out your pages and specifically place items like titles, subheadings, pictures, and written information.
Making the Color wheel
- Collect the essential materials:
- Color wheel photocopy
- Small sheet of Bristol board
- Paper fastener
- Scissors
- Glue stick
- Acrylic paint kit
- Cut out the four pieces of the color wheel from the photocopy.
- On a sheet of Bristol board glue all four pieces completely and thoroughly. (Tip: glue the pieces so that at least one side is along an edge of the Bristol board- this way there are fewer cuts to make.)
- Once the glue has dried, cut out all four pieces from the Bristol board stock.
- Using acrylic paint, paint the colors of the color wheel in the appropriate places.
- After the paint dries, attach all four pieces of the color wheel together at the center using the paper fastener. This should be in this order from back to front: Color wheel, Triad spinner, Split Compliment spinner, Compliment spinner.
Mounting the Color Wheel into your sketchbook:
- Open your sketchbook to a the next page without writing on either side
- Lay the color wheel you just made along the outside edge of the page- it does not matter if it is a left page or right page as you look at your open sketchbook.
- Cut a strip of paper two inches wide and the hight of your color wheel.
- Glue the folded strip as a hinge along the outside of the page and onto the back of your color wheel so that the color whee is visible as you look at your color wheel page and it may be folded in, over the color wheel page.
- Allow the glue to dry and follow the directions below on how to author the Color Wheel page.
Authoring the Color wheel Page
- Title the page of your sketchbook “Color Wheel” at the top neatly.
- On this page in full, complete sentences, and in a visually creative way, answer the following question correctly:
Color wheel Questions:
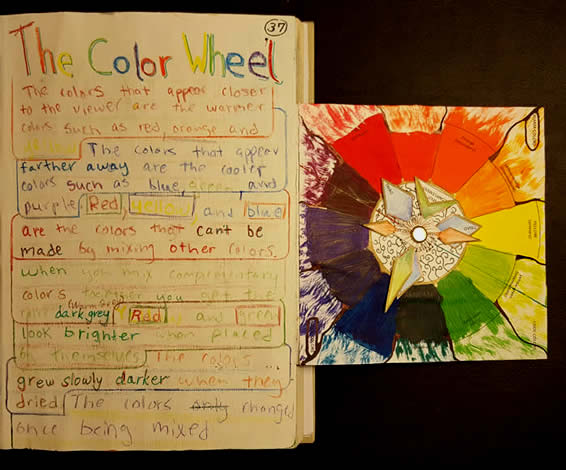
- Which colors advance or appear to move toward the viewer?
- Which recede, or appear to move away from the viewer into the distance?
- Which colors can not be made by mixing any other colors together?
- What happens when you mix compliments together?
- Which colors when placed next to each other look brighter than they do by themselves?
Media Questions:
- Do the colors change from the time they are wet and just mixed to when they dry?
- List and define 3 basic acrylic techniques (Hint: use you painting textbook as a reference)
Assignment Turn-in
- Using Google Drive or another .PDF Scanner App, create a .PDF of all pages included in this assignment from the Value Key Info to the Value Key Models.
- Upload or save your .pdf file in your Google Drive Turn-In folder in the appropriate assignment subfolder if available.
- Rename this .pdf as follows:
- <YourName>_<ProjectName>_<Assignment>.pdf
- Example- JohnDoe_StillLifeProject_ProjectPreparationPage.PDF
- NOTE- In Google Drive you do not need to add ".PDF" when you rename the file
|
